Graphics CODEx
A collection of (graphics) programming reference documents
Shaders
Overview
Writing a shader that looks good is a delicate art, but writing a shader that looks good and performs well is often considered magic and can often be platform specific, or even shader stages specific. However, there are a lot of principles and ideas that apply to multiple platforms, so with keeping these things in mind, you can hopefully write a shader that performs well.
Profile, Profile, Profile
Before we delve into some specific subjects, I must give the big disclaimer that a lot of GPU hardware responds differently to different optimisations and there can often be many different factors at play. It is extremely important to state that you should never assume that a shader will be faster by doing a certain change, and instead should always profile your changes to get a good idea of the impact.
Vertex Stage
Limit input data size and count
When creating a vertex shader, input data has to be specified, either per vertex or per instance. On some hardware, this data is fetched by dedicated hardware units, on others these are added as instructions at the start of the shader by the driver shader compiler. In the former, these hardware units often have limits on how much data can be fetch per clock efficiently. In the later, since these are effectively buffer loads, these are extra instructions that can increase the latency of your shader. As a result, care needs to be taken to not fetch too much data per vertex. It is often a good idea to pack your vertex and/or instance data CPU side and unpack within the shader to reduce the impact on these units and reduce the memory bandwidth requirements.
Be clever with your interpolators
When we require data in the pixel shader that is calculated by the vertex shader, such as vertex positions or normals, we pass these through the use of interpolators. As with the vertex input data, how this data is passed between shaders is dependent on hardware. Some uses dedicated hardware units, others use local data share memory, the same memory that is used for group shared memory usage, and interpolates using in-shader instructions. As with vertex input, there is often an optimal amount of interpolators. This can either be because of the dedicated units having a limit, or because of the fact that these vertex instructions have a fixed cost and need to be issued per component. As a result, you want to try to limit your interpolators as much as possible. If you do not need interpolation and use the leading vertex data instead, you can often save instructions and memory this way and lead to better shader performance.
Pixel Stage
Leverage early depth testing
Early depth testing is an optimisation that is crucial for rendering higher primitive counts
at higher resolutions. However, there are certain things that you can do in your shader that disable the use of early depth testing and as a result need careful
consideration to see if the performance loss is worth it. Examples of things that disable early depth testing is enabling alpha blending, using the discard
instruction or manually writing to depth from the pixel shader.
Limit export size and count
Similar to having to be careful with the amount of data you declare as vertex input and interpolator count, you also have to be careful with how much data you
export from your pixel shader (colour output). Most hardware is optimised for a single 32-bit export (e.g. a single R8G8B8A8 render target), with anything
more resulting in higher export costs, as the export pipeline can only handle a certain amount of exports at a time. Having too many pixels export a value
combined with a higher export requirement can cause the export units to stall resulting in a performance loss.
Compute Stage
Think about your barriers
When writing compute shaders, any instructions or memory access that have to be synchronised between different threads of the same group require barriers. However, these barriers have a direct impact on performance as it means that threads that are running ahead of others can’t issue any new instructions until the other ones have reached the same point. This effectively hinders latency hiding, which is one of the primary techniques that the GPU uses for optimisation. As a result, be careful with writing code that requires barriers to operate.
Structure group shared data to avoid bank conflicts
Group shared memory in compute shaders is divided into banks. Most hardware uses 32 banks of 4-bytes each. When multiple threads are accessing group shared memory, if any threads access memory whose addresses resolve to the same bank, a bank conflict occurs. This results in the hardware having to serialise the access to these banks, resulting in a loss of throughput.
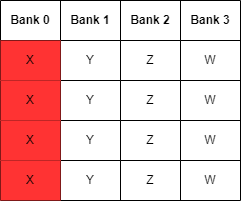
In the following example, we assume an imaginary hardware of 4 threads per wave and LDS consisiting out of 4 32-bit banks. We create an array of 4 32-bit
float4 vectors in group shared memory, with each thread sequentially accessing the components of the float4. If we simply place these float4 sequentially
in memory, then when each thread accesses a component, it would translate to the same bank addresses, resulting in bank conflicts.
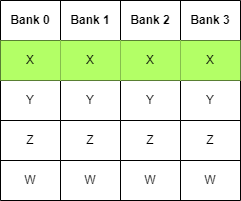
If we simply re-order our float4 elements to be interleaved instead of sequential, then when each thread accesses a component, it would translate to a
separate bank, avoiding the bank conflicts and directly resulting in faster memory access and a more performant shader.
Any Stage
Prefer using sRGB texture
When using sRGB data, such as a diffuse albedo, make sure to mark up the texture format correctly as sRGB. This results in the texture unit automatically doing the conversions for you, sRGB to linear when sampling and linear to sRGB when storing. Offloading these calculations to the texture unit results in less instructions in your shader and at the same time guarantees that the conversions are done the correct way.
Prefer Load over SampleLevel when point sampling
When trying to retrieve the data of a texture using point sampling at a specific mip, it is often a good idea to use the Load instruction over SampleLevel.
This is because SampleLevel still has to do sampling logic, offloading to the texture unit, while Load can often be done using simpler mechanisms in the
hardware, resulting in less texture unit pressure. This is only possible however if you know the dimensions of the texture you are accessing, which can often
easily be supplied through the use of a constant buffer value.
Use Gather when possible
If you are accessing multiple neighbouring values from a texture, it is often a good idea to use Gather over Sample. This effectively bundles up a sample
instruction for 4 neighbouring pixel locations at the same time, once again resulting in less texture unit pressure. Gather can only return the value of a
single component however, though newer hardware API’s (e.g. DirectX) have got different instructions for the different channels, such as GatherRed,
GatherGreen, …
Reduce memory transaction
Memory bandwidth is often one of the largest bottlenecks of shaders. This can be due to vertex input, pixel export, but also due to high counter of buffer loads or texture samples. In general, it is almost always a good idea to try to minimize these instructions to reduce the amount of pressure you put on the memory units. It is also worth noting that these are also often the largest energy costs, meaning that on battery powered devices (e.g. mobile), high memory bandwidth results in higher battery drain which can result in the devices under-clocking themselves.
Keep data locality into account
When sampling data is unavoidable, make sure that the data is ordered in way that lines up with your sampling patterns. Accessing data that don’t correspond with the patterns the hardware expects us to access it leads to cache misses, which results in higher latency memory accesses. By making sure that your data is accessed in a cache-friendly manner, you can gain significant speed-ups in your shaders.
Avoid integer operations
This one is a bit of a hard one. Some GPUs deal fine with integer operations, others really don’t. This mostly holds true for older Intel GPUs and OpenGL drivers, but have been known to cause some very nasty and hard to track down bugs on multiple occasions.
Besides driver issues on certain combinations, certain integer operations are also slower than some people expect. For example, on GCN, a 32-bit floating precision multiplication is 4 cycles, while a 32-bit integer multiply is 16 cycles, 4 times slower!
Last modified on Sunday 13 March 2022 at 16:08:49